

My grandson plays numerous games that involves Zombies, both at home and at school. I thought I would make some Zombie cookies for him in time for Halloween.
Where I live Halloween is not very popular, unlike other parts of the world. I am aware that Martha Stewart has numerous books relating to Halloween food, costumes, party themes and decorations. Here you only see a few items of dress up clothing and lollies in the shops but not much else.
You might be lucky enough to have a “trick or treat” door knock early in the evening, but these children are often not dressed up a great deal. I make sure that I always have some sort of lollies on hand just in case. But we have gone some years without a single door knock.
For the biscuits, I made a dough that you could roll out and then cut to shape, it was very easy to handle. As my design was quite big I didn’t have a cutter large enough so I had to use a drinking glass, which worked fine.


This is the creamed butter and sugar. This is the finished mixture.

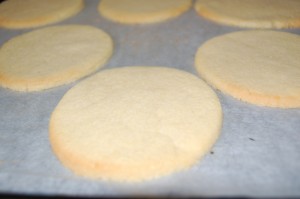
Rolling the mixture between baking paper. Cooked biscuit, just taken out of the oven.

Icing that I have mixed ready for decorating the cookies. Place plastic wrap on top of icing in an airtight container to keep.


Outlined cookie using a cake decorating food pen available here. Food Pen – Sky Blue
I used Rainbow Dust in blue as that was the only colour I could get at the time, black would have been better.
I thinned the icing a little, but as you can see not enough to make it fully smooth. But that is okay for what I want to do.

The cookie showing more detail with the coloured icing.


The finished Zombie cookie with a little more detail again using the edible decorating pen. I had also decided to make another variety of cookie, the RIP ghost. The orange icing on these looks like a very bad flooding attempt but I actually wanted it to be as rough as possible to add to the effect.
Regardless of the reason I made these cookies, my grandson will devour them because they are Zombies.
Whilst writing this post my grandson has just come back from a three day school camp, and apart from being extremely tired and excited about the whole trip, there was still time for these cookies.
Yes it was the Zombie that won between the two designs, and it got a definite big “thumbs up”.
Hope your family get as much fun out of making these and even more devouring them. How did they work with your family?
- 110g butter
- 110g caster sugar
- ½ egg (2 tbls)
- ¾ tsp vanilla extract
- ½ tsp almond essence
- ½ tsp salt
- 187g plain flour
- Icing: (Enough for about 8 of my size cookies)
- 181g pure icing sugar, sifted to remove lumps
- 1 egg white
- 1 tsp lemon juice
- 2-3 drops vanilla extract
- COOKIES
- Pre-heat oven to 375ºF or 190ºC.
- Cream together butter and sugar until fluffy and light. Add egg, salt, vanilla extract and almond essence and mix well to combine.
- Gradually add flour to the butter mixture until all is incorporated. The mix should be quite dry to touch, not sticky.
- Roll dough between two sheets of baking paper until it is ¼” thick. Chill in the refrigerator for at least 30 minutes.
- Cut into shapes required, (mine were large rounds). Put on trays which have been lined with baking paper.
- Bake at 375ºF or 190ºC for about 7 minutes. Time will depend on the size of your cookie, because mine were fairly large I needed the 7 minutes. You should remove these from the oven before the edges start to turn brown.
- Leave on trays to cool completely.
- My cookies are quite soft to eat, but still able to be decorated easily.
- ICING
- Beat icing sugar and egg white until glossy and thick.
- Add lemon juice and vanilla extract, mix to combine.
- This is now ready to use.
- If not using immediately put icing in an airtight container with plastic wrap placed on the top of icing before putting on lid.
- You can colour your icing to whatever you require for your cookie design. To flood the design you will need to thin the icing to a runny consistency. I wanted a more rough appearance so left my icing a little thicker.
- If you make cookies that are smaller than mine you will yield more than 10.

